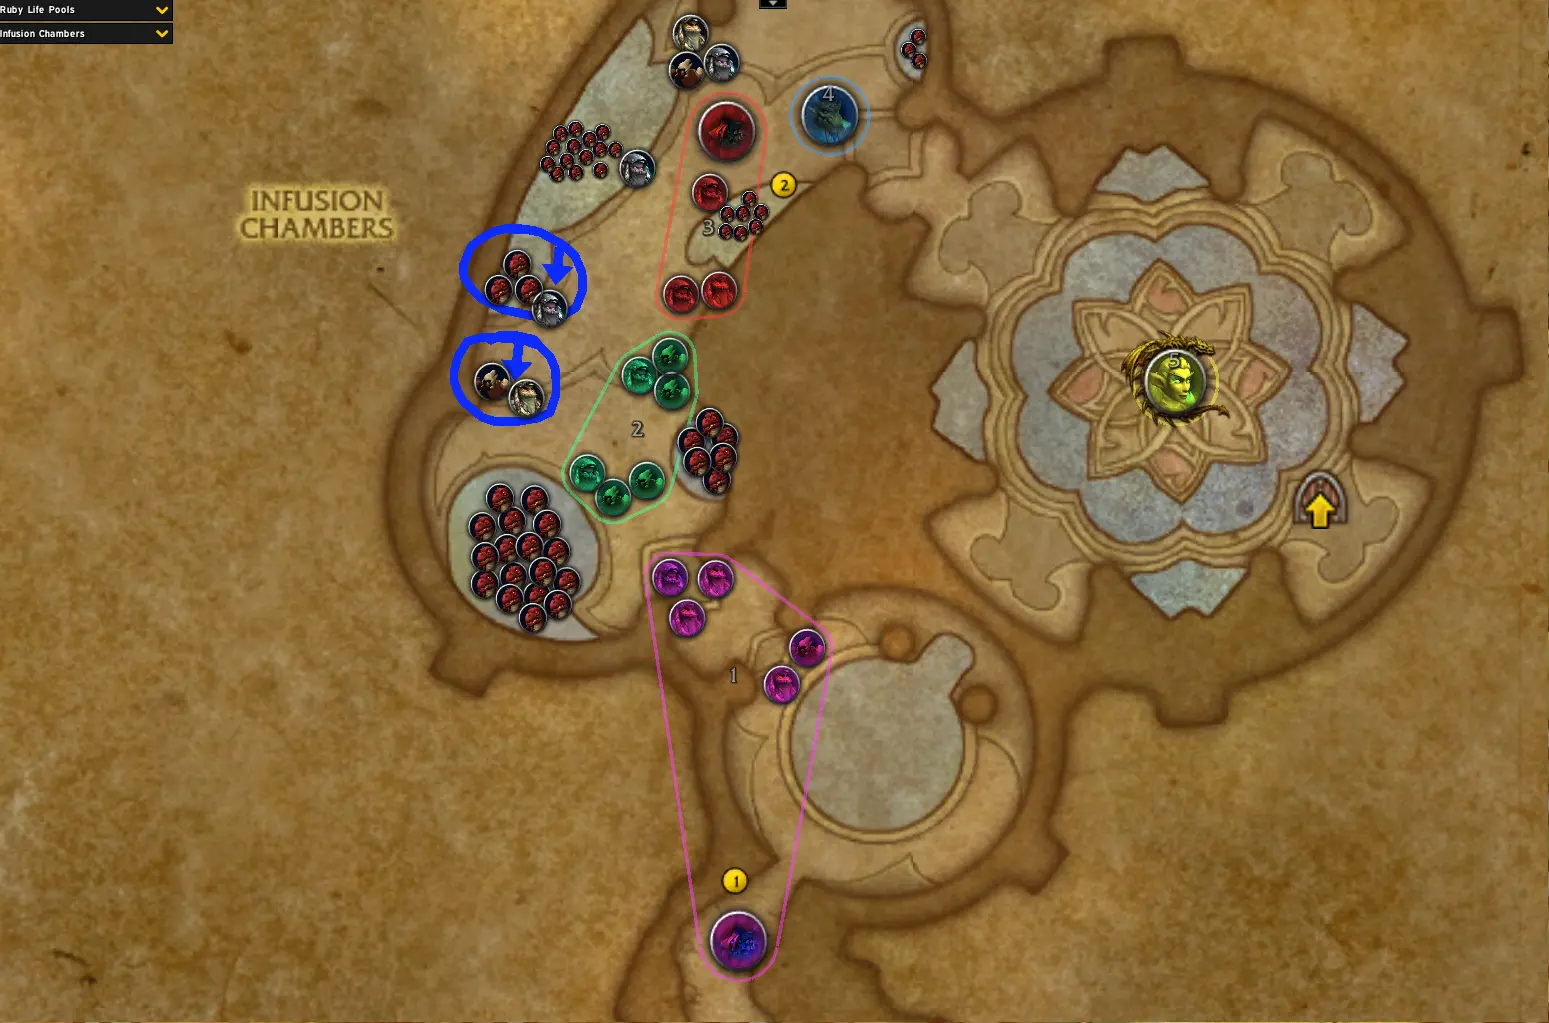
Search

THE WAR WITHIN RELEASES IN

Days
Hours
Minutes
Seconds

WOW TOKEN PRICE

NA 300.627 Coin Image • EU 375.335 Coin Image

THIS WEEK IN WOW

Fortified • Afflicted • Raging

LATEST BLUEPOST

SEASON 4 CLASS GUIDES

Ruby Life Pools – Dragonflight Season 4

Our Ruby Life Pools – Dragonflight Season 4 Guide prepares you for all the adventures in World of Warcraft’s latest Season! Check out our Dragonflight Ruby Life Pools S4 Guide here on Your-MMO.com

Ruby Life Pools – Dragonflight Season 4

Our Ruby Life Pools – Dragonflight Season 4 Guide prepares you for all the adventures in World of Warcraft’s latest Season! Check out our Dragonflight Ruby Life Pools S4 Guide here on Your-MMO.com

MDT Route for S4 Ruby Life Pools

First Boss: Melidrussa Chillworn

Notable Trash Mobs in this Area

Sidestep the Primal Juggernaut‘s  Excavating Blast. Your tank must pay attention to the tank-buster ability –  Crushing Smash.
 
Interrupt Flashfrost Chillweaver‘s  Icebolt &  Ice ShieldThis is by far the most important caster in the area.
 
Use CC abilities to stop Flashfrost Earthshaper‘s  Tectonic Slam.
 
Be aware of the clutches of eggs in the pools around the area. These will hatch if any player or enemy steps on them, spawning one Infused Whelp for each egg that was hatched. These casts  Cold Claws relatively frequently on the highest threat target leading to a large amount of unnecessary frost damage and a potential stun if not dispelled.
 
At last, when facing Defier Draghar, make sure to avoid its frontal charge –  Blazing Rush. In addition, your tank must use a defensive during the  Steel Barrage channelled attacks.

Melidrussa Chillworn Notable Abilities

  • Use healing cooldowns during the  Frost Overload, the longer the shield lasts the more you have to heal. This is the hardest part of the fight.
  • Avoid the  Hailbombs before it hits the ground.
  • Avoid the  Hailbombs before it hits the ground. It is bait to bait them close to each other so you can have more room to play around.
  • The person that gets a  Chillstorm must place it outside of melee and preferably away from your group. Keep in mind that you have a limited time to escape the “vortex” without taking any damage. Here is a good place to use a defensive cooldown if you are in a critical HP. Remember that at the end of the  Chillstorm cast, it will do damage and push you back, so stay away from any existing  Hailbombs.
  • Important mechanic: At 75% and 45%, Melidrussa Chillworn will spawn a dozen of Infused Whelps that do only auto-attacks to your tank and apply  Cold Claws (healers must dispel that). During this time, you have to break the  Frost Overload to end the intermission.
  • Use healing cooldowns during the  Frost Overload, the longer the shield lasts the more you have to heal. This is the hardest part of the fight.
  •  

Second Boss: Kokia Blazehoof

After defeating Melidrussa Chillworn, hop on the one of the Radiant Drake, who will carry you to the next area.

Notable Trash Mobs in this Area

Interrupt Primalist Cinderweaver‘s  Cinderbolt at all times. Occasionally they will buff themselves with  Burning Ambition, having higher haste but also taking 25% more damage. If you feel confident, let the debuff persist so you can kill them faster.
 
Stop any  Flame Dance casts coming from Primalist Flamedancer. In addition, right before they die, it will trigger  Blaze of Glory – dodge the ground swirlies and break/purge the shield as quickly as you can.
 
Pay attention to Blazebound Destroyer‘s  Living Bomb, it goes on a random target, it does damage per second and it explodes at the end, dealing a high amount of damage – knocking you in the air (use defensive cooldowns if vulnerable). Sidetip, you can get closer to melee and use the  
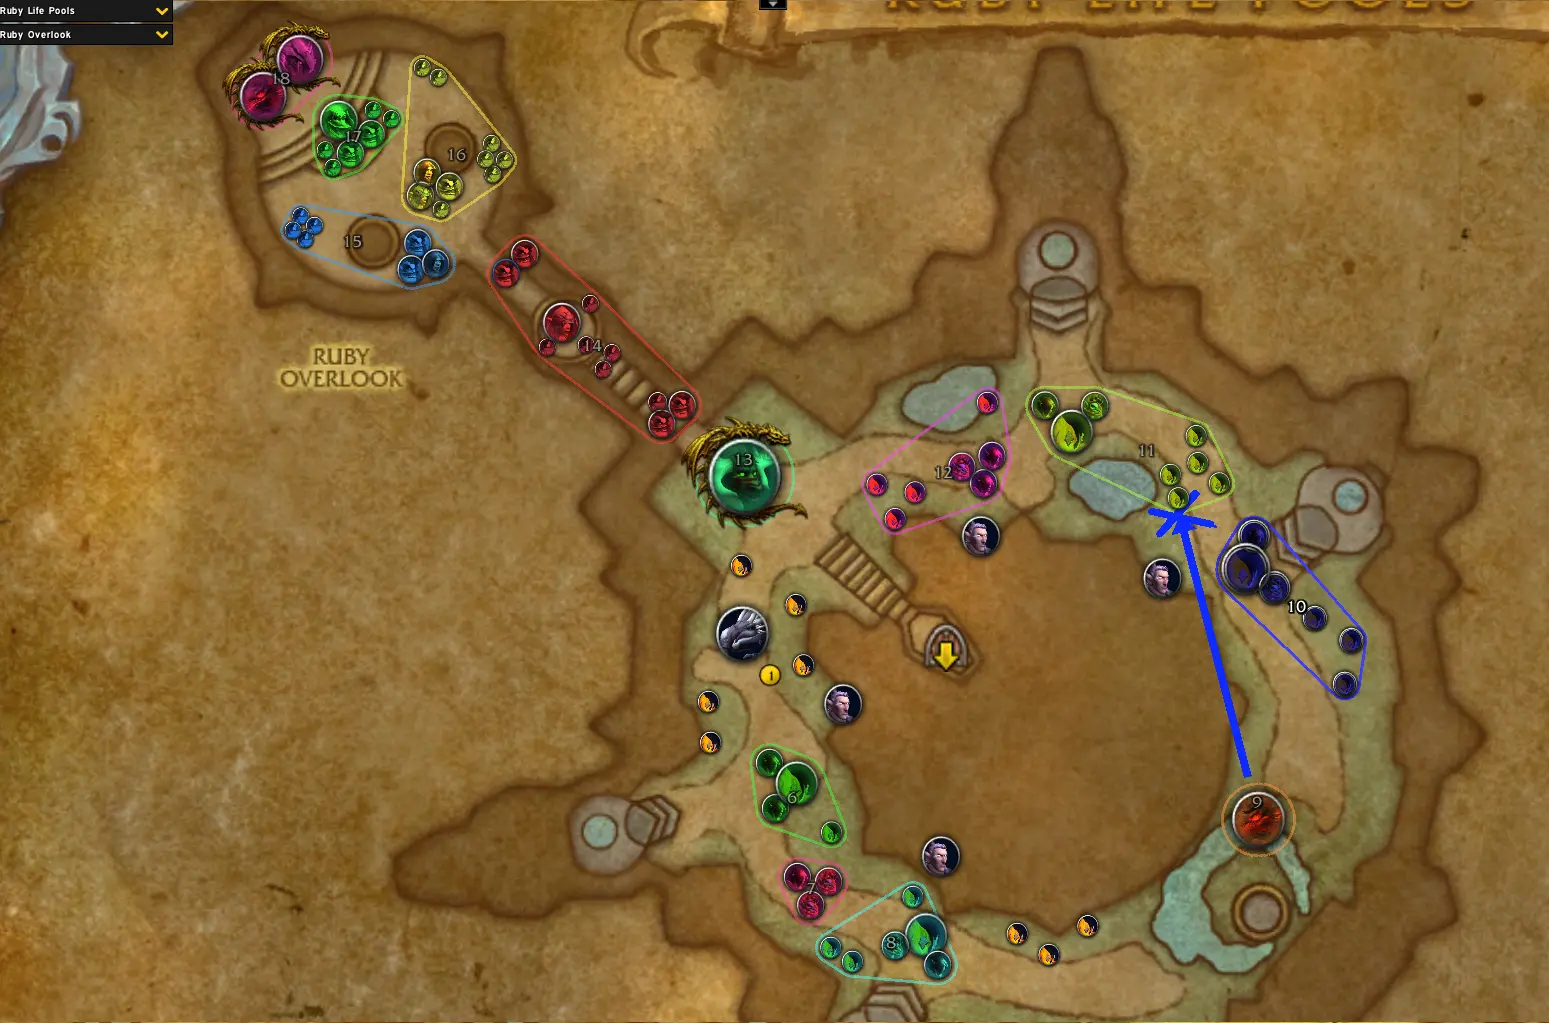
Living Bomb end-close knock-up explosion on Primalist Cinderweaver & Primalist Flamedancer to disturb them. In addition, Blazebound Destroyer will occasionally cast  Inferno doing unavoidable AoE damage to everyone within 100 yards, plus an additional damage-over-time effect every 2 seconds for 6 seconds.. Finally, when the Blazebound Destroyer is defeated, it will cast  Burnout – quickly move out of melee to avoid taking lethal damage.
 
Once Flamegullet is below 50% health it will cast  Molten Blood, which can be treated as an Enrage effect that cannot be dispelled and will deal damage to all players within 60 yards.
 
Watch out for  Rolling Thunder debuffs. It will always apply 2 applications, each of them going on a random player from your party. Upon expiring, it will deal massive damage to all players within 100 yds.

Kokia Blazehoof Notable Abilities

Final Boss: Kyrakka and Erkhart Stormvein

Notable Trash Mobs in this Area

Avoid staying unnecessary in melee during Storm Warrior‘s  Thunderclap, which will reduce your Haste and Movement Speed if inflicted.
Primal Thundercloud have a large absorb on them; when this expires, is dispelled, or runs out of health, they cast  Crackling Detonation at a location (dodge it) before despawning.
 
Use defensives when Tempest Channeler is casting  Lightning Storm. In addition, use your spare interrupts to stop the  Thunder Bolt.
 
Interrupt Flame Channeler‘s  Flashfire at all costs, as not only does it deal damage to a random player, but it also heals the Channeler. You can choose to ignore the  Burning Veins buff since it makes them take more damage, but it also increases their Haste by 50%.

Kyrakka and Erkhart Stormvein Notable Abilities

  • Dodge  Roaring Firebreath coming from Kyrakka, failing to do so will apply a a  Infernocore to you. Once  Infernocore expires, it will leave a lingering  Flaming Embers fire pool on the ground. Heads up, if you get in contact with  Flaming Embers, they will re-apply  Infernocore.
  • Stop casting when Erkhart Stormvein is about to finish its  Cloudburst channel, otherwise, it will “lock” you on a spell cast for a short period.
  • Beware when Erkhart Stormvein is casting  Winds of Change, as it will deal AoE damage to everyone and also apply a pushback effect. The pushback effect will also move any existing  Flaming Embers.
  • During Phase 1 of the fight, Kyrakka will periodically target one player from your party to cast  Flamespit, make sure you use defensive!
  • Chunking Kyrakka‘s health is going to be the most important as they are the more dangerous part of the boss fight. Use every opportunity to deal damage to them while they are on the ground during Phase 1.
  • Position Erkhart Stormvein (Phase 1) to allow your DPS to dodge  Roaring Firebreath while not being too close to the edge to accidentally get pushed off by  Winds of Change and simultaneously cleave off Kyrakka.
  •  Stormslam is a very powerful tankbuster with a stacking magic vulnerability debuff that does not fall off on its majority of the time. Ask for your healer’s dispel and plan your defensive cooldowns better.
  • Be aware of where all the  Flaming Embers are, and position the boss so that you have an escape route if the winds push them towards you. As the tank, you are uniquely positioned to be able to see behind your group – in this fight, this is a major advantage!
  • This fight is made arbitrarily harder the worse your group is at dodging avoidable damage and not standing in  Flaming Embers. Be aware of your surroundings.
  •  Infernocore stacks hurt; the good news is that the unavoidable ones (from  Flamespit) are only going to go on 2 people. The bad news is that DPS randomly taking avoidable damage will compound this problem, as they’ll also be punished with bonus  Infernocore stacks.
  • Do not panic! Track ability timers, and play proactively rather than reactively on this encounter. Preparation and anticipating mechanics are some of the best ways to not get caught out and roasted by the breath, boxed in by  Infernocore or thrown off the platform.

LATEST NEWS

diablo 4 season 4 loot reborn
pokemon shrouded fable announced preorder
global accessibility day in diablo 4
wow remix mists of pandaria now live
newb world adventurer spotlight
weapon tuning final shape

LIVE STREAM